12 Months of Tags - May 2016
Hi crafty friends! I am down to the last minute in creating and sharing my Tag for the 12 Months of Tags challenge that Tim Holtz has monthly. One of my goals for this year has been to participate in the monthly challenge. I really enjoy working with his products and it is a chance for me to really let my creativity go wild.
Sometimes I don't like the direction the tag is taking me, but I persevere as I did no this one and the results are great!
My stamped butterflies on the left side of the tag were not coming through on my washi tape. I was not happy with the look, but I continued on with the tag. When I was looking for my embellishments, I came across my stickers that had the Butterflies & Moths. Since they matched the stamp I was attempting to use, I added the stickers and it really seemed to work.
I get to go crazy and let loose when creating these tags. I am not creating for anyone but myself, and that is why I think I love these challenges.
Here is a closer look at my tag.
Thanks for stopping by!
Layerd Flowers
Hey friends! Now I am not typically a flower person, but recently I have been way into flowers.
I had the idea of layering flowers and creating a 3-D affect. Now I know this is not a new concept by any means, but it is a great one! So for my post today, I wanted to share with you my layered 3-D Flowers!
The Line Flower is a great stamp to create a layered affect. It worked perfect with the Wispy Chrysanthemum outline as a shadow. There are several flowers in Suzy's shop that would work great for this affect. I will be sure to list them below for you.
Here is what I did.
I first stamped 4 line flowers onto script designer paper. I colored all 4 using my distress crayons, but any coloring medium will work. I fussy cut out the middle section (3 petals) from two of the stamped images and the full flower from the other two. I curled up the edges and adhered them to the center of the other two flowers.
I stamped the Wispy Chrysanthemum flower to some cardstock and adhered the flowers in the middle of the stamped images. I added a skittle to the center of each flower and stamped my sentiment Imagine.
Below are the supplies I used for this project. The last two flowers were not used, but would also work great for layered flowers.
Fancy & Fun
Hey everyone! I am here to share a card I made for the Design Team Challenge over at Riley and Company. Angji has asked us to get Fancy and Fun this time around.
I am using Heart Riley and have paired him up with Learn to Love. I have added some Fancy elements to this card to make it Fun!
Don't forget to check out the rest of the Design Team's projects. I am sure they have a big HUG waiting for you over on their blog.
Not enough Riley and Funny bones for you? Don't forget to check out the Tickle My Funny Bone stamp club!

Its Cool 2B Caddy
Have you seen these Deflecto Caddy's? I love mine. I have two of them and they are great to store my inks. I love that they are stackable. But the best part is each container is removable so that you can take what you need.
Here are a couple of pictures of how I use my Caddy. How would you use yours?
Here are a couple of pictures of how I use my Caddy. How would you use yours?
2016 So Suzy Design
I am so excited, I finally get to reveal the new Design Team for so Suzy Stamps! Now I may be an oldie, but the excitement of staying on is as new as ever.
I have been fortunate to be part of this design team since the beginning. I love creating with So Suzy Stamps and I love the sense of family this community has. It has been a pleasure being part of this community and the friendships that I have made.
You all are in for some great inspiration from this team and a few shenanigans along the way. If you are not familiar with So Suzy, here are some links to help you find your way!
Congrats to the new team!
Facebook: Flaunt it if you made it
Store: So Suzy Stamps
Celebrating Mom
Hi everyone. I am here today to share with you a project I created to celebrate Mother's Day. My idea started with buttons and lace. My Mother was a seamstress while I was growing up and I knew I wanted to include elements that remind me of her.
I love the color of the Deflecto 4 x 6 Purple Frame. It is so vibrant and worked great to frame my Rose Design Paper.
I used lots of frills on this frame. I love the vintage looking buttons and lace. They really make the frame look so dainty. I also used Deco Foil and Adhesive rub ons to decorate the left side of the frame. The Deco foil is so shiny and is a great accent on this frame.
"This is a sponsored post. As a member of the Deflecto Design Team I have been provided product in exchange for my creative ideas, views and opinions."
Bail Money!
Today is the start of another design team challenge over at Riley & Company. Joy has challenged us to make a masculine card.
I love this sentiment! It cracks me up every time I read it. It is called "Conversation with Officer" and I paired it up with "Police Moose."
Don't forget to check out the rest of the Design Team's projects. I am sure they have a big HUG waiting for you over on their blog.
Not enough Riley and Funny bones for you? Don't forget to check out the Tickle My Funny Bone stamp club!
Framed Fairy Card
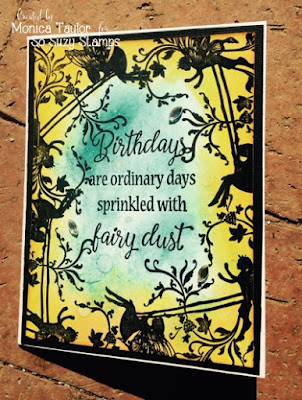
Hi friends! I am here today to share with you a card I made using the Swinging Fairies Stamp and Ordinary Days Stamp. As you may recall, Ordinary Days was part of the April release and is fabulous. There are so many fairy images that work great with this sentiment and I am here to show you one of them.
Now I am typically a vintage girl, but I have to tell you, this Fairy Stamp is high on my list, and this card is one of the reasons. A stamp that has so many details has so many possibilities. You can stamp it so many ways to create unique cards every time.
For this card, I created a frame for my Birthday sentiment. Ths shape of the stamps made it very easy to frame my card.
Here is what I did:
I distressed the sides of my white card stock with Mustard Seed and Fired Brick. I then distressed the middle part of my card stock using Faded Jeans.
Using my MISTI, I stamped the card stock to create a frame. You can see I made sure to stamp each image so that it looks like one continuous image, (aren't I clever.)
I dropped a few drops of my Metalic Sky Liquid Metals into a water spritzer and shook it up well. Then I sprinkled my card (sprayed) with fairy dust. If you are using the spritzer for the first time, spray a few test sprays on scraps to make sure the spritz is coming out evenly.
This truly is a must have stamp! There are so many possibilities!
Stencil Layered Backgruonds
Hi everyone and Happy May! I can't believe I am actually saying that. This is the last month for the current DT over at So Suzy Stamps. With that, we are taking a path down memory lane and sharing with you some of our favorite stamps that have been released over the last few months.
I shared several cards last month using my new Distress Crayons. Here is another card I made last month and did not share...until now. The Blowing Flower Tree was very popular in last months release to no surprise. It is a beautiful stamp. I love how the sentiment Devil Whispers fits so nicely underneath the blowing flowers.
I added some stencils to the mix on this one to create this background. The colors blend very easily using a damp paper town or blending collage medium.
So with that we say good bye to the current design team. But don't worry, next month the new team will be ready to share some new releases and a lot of fun I am sure!
Thanks for stopping by!
Products I used:
Subscribe to:
Posts (Atom)
Featured Post
Challeng Winners - February & March 2023
Hello everyone. As you may have noticed, I have been MIA for the last couple of months. Life has been very busy and it has been difficult...

-
Hi friends! I am so excited about the new idea-ology product that Tim is releasing this year that I decided to sit down and create! My fav...
-
Hey everyone! I hope you are enjoying the projects created by the STAMPlorations design team for the Spring Fling event. It is Day 2 an...
-
Hello everyone. As you may have noticed, I have been MIA for the last couple of months. Life has been very busy and it has been difficult...


